Developing Custom Connectors for the Microsoft Power Platform
I recently had the privilege of delivering a Microsoft session at Microsoft Ignite titled Developing Custom Connectors for the Microsoft Power Platform.
This session included an extensive demo on creating a custom connector for Yelp’s business search REST API. Since it is a free service, it actually makes a lot of sense to use it as an example of how to create a customer connector for Microsoft Flow or PowerApps. Since I had to recreate the demo, I thought other people could benefit from the notes I put together; hence this article.
The demo breaks down into the following three sections, which I will go into detail on.
- Understanding the Yelp Fusion API
- Creating and testing the custom connector in Flow
- Creating a Flow that uses the custom connector
- Building a PowerApp that uses the custom connector
Yelp Fusion API
The Yelp Fusion API (www.yelp.com/developers/documentation/v3) allows you to get the best local content and user reviews from millions of businesses across 32 countries. The API has a number of methods, but we’re going to focus on the Business Search used to search for businesses by keyword, category, location, price level, etc.
The first step is to create a login on www.yelp.com. You’ll need to make sure your email address is confirmed. If you haven't done this, you can go to Account Settings - Email / Notifications.
Once you’re logged in and validated, you’ll need to create an app at https://www.yelp.com/developers/v3/manage_app.
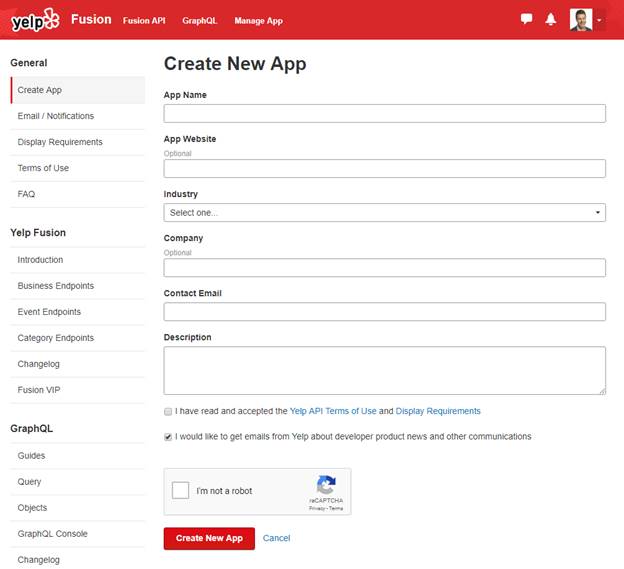
Once you’ve created your app, Yelp will present you with a Client ID and API Key. You’ll need the API Key later, so hang onto that.
With your app created, you should spend some time just playing around with the API and making sure you understand it. The easiest way to do that is with Postman, which you can download and install from https://www.getpostman.com/. Yelp even has a Postman collection you can load on the https://www.yelp.com/developers/documentation/v3/get_started page.
In Postman, follow these steps to try out the /businesses/search endpoint.

1. Open the Yelp V3 – Share collection in Postman.
2. Select /businesses/search in the list of requests.
3.Select the Headers tab.
4. Enter the Key of Authorization with the Value of Bearer xx-xxxxxxxx…, replacing the x’s with the API Key from the previous step.
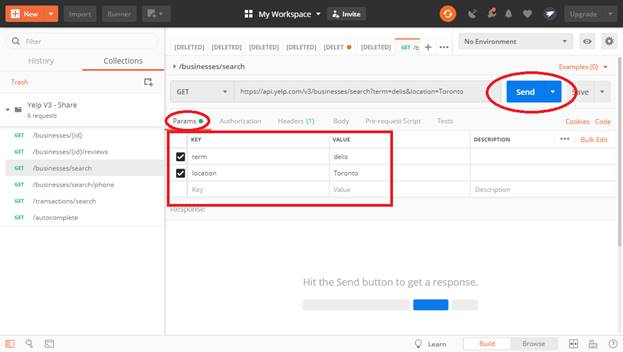
5. Go to the Params tab and enter sample values. You can leave the defaults, or remove the latitude and longitude parameters and add a location parameter.
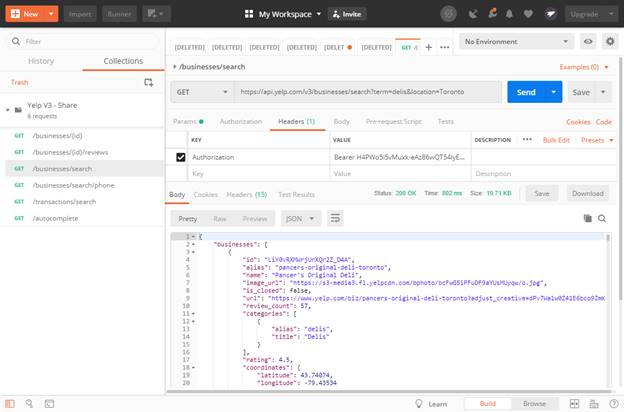
6. Press the Send button. You should see business results in the Body section.
Once you’re satisfied that you understand how the API works, you can export the collection to use in the next step. For Flow, you’ll need to ignore the deprecated note and export the collection as a v1 file.

Creating the Yelp Custom Connector
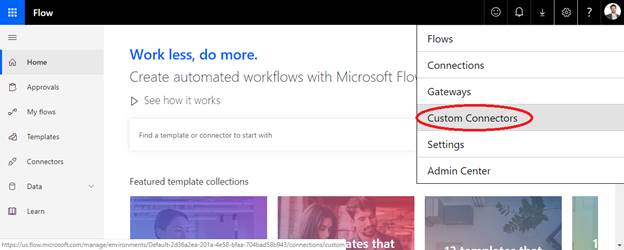
Next up is creating the custom connector in Microsoft Flow. The first step is to sign into Flow at https://flow.microsoft.com. On the gear menu, select Custom Connectors.
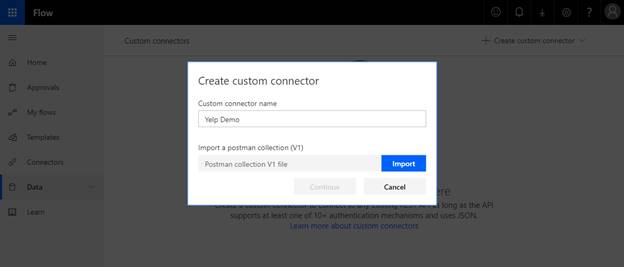
Create a custom connector by importing a Postman collection.
Name the custom connector and import the file exported from Postman.
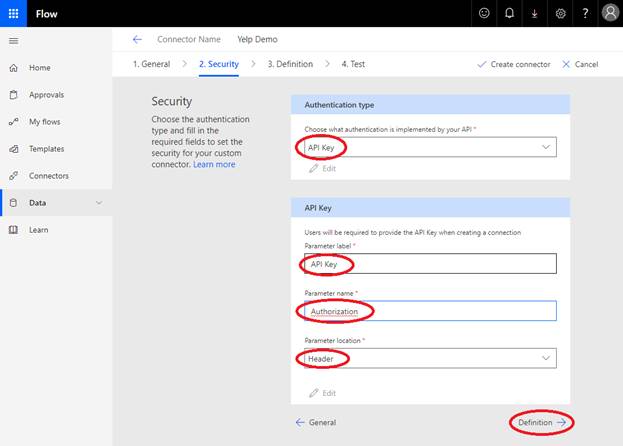
Go to the Security tab, set the authentication to API Key, and enter the values below.
| Parameter Label | Parameter Name | Parameter Location |
| API Key | Authorization | Header |
If desired, you can leave all the Actions there, but for now we’re going to delete everything but the /businesses/{id}/reviews and /businesses/search to keep it simple.
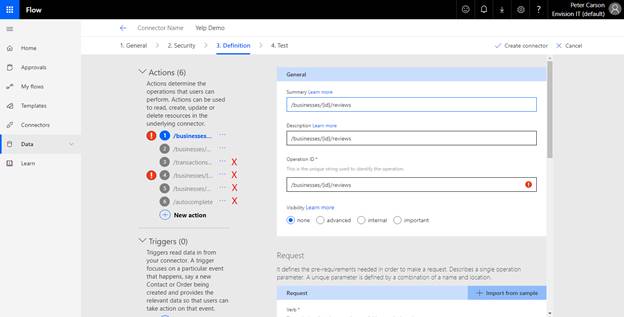
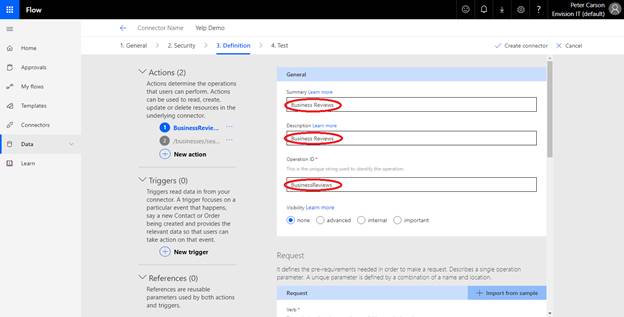
Next, select /businesses/{id}/reviews, and set the summary, description, and operation ID all to be Business Reviews, but don’t put a space in the Operation ID.
In the Request section, you’ll need to Import from sample. You can use the sample URL from the Yelp https://www.yelp.com/developers/documentation/v3/business_reviews, which is https://api.yelp.com/v3/businesses/{id}/reviews.
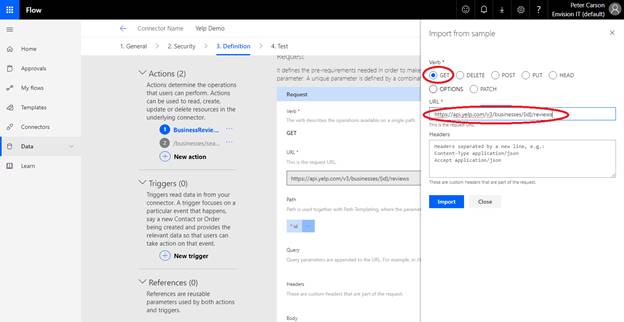
You’ll also need a sample response to import. You can use the response body on the Yelp https://www.yelp.com/developers/documentation/v3/business_reviews page. Be aware that you can’t edit the sample on the import page, but you can click into it and paste your sample in.
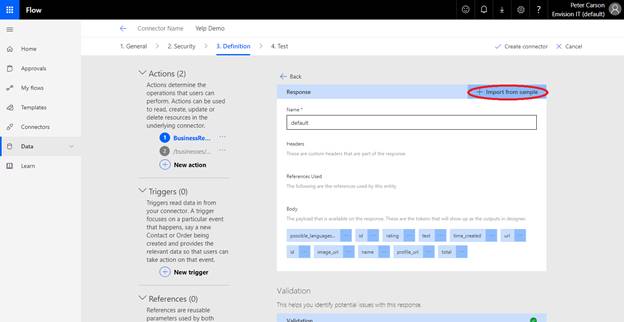
Repeat the above steps for /businesses/search, setting the summary, description, and operation ID all to be Businesses. You don’t need to import a sample request, as there are no parameters for this action. For the response though, be careful when pasting the response body from https://www.yelp.com/developers/documentation/v3/business_search. The line with // …. And the comma on the line above are not valid JSON and need to be removed before importing. Pasting it into Notepad works well for a quick edit before importing.
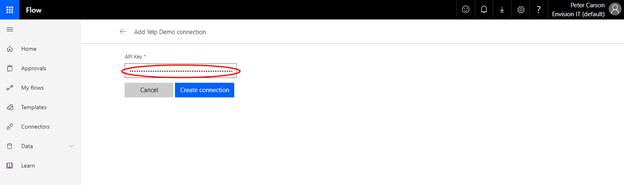
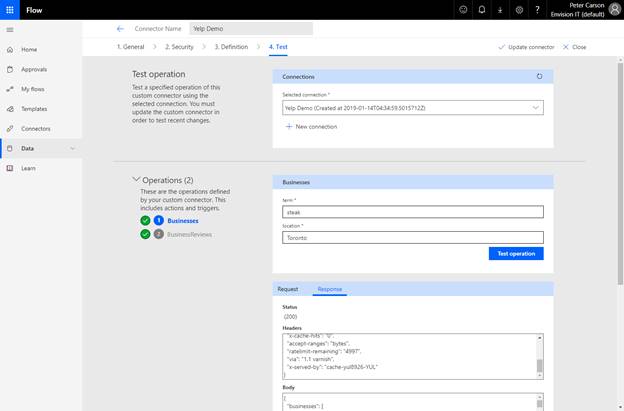
You’re now ready to test the connector, but you need to save it first with the Update connector link. You also need to select a connection. Create a New connection, and paste in the Bearer xx-xxxxx… API Key, and then refresh the connections to select the new connection.
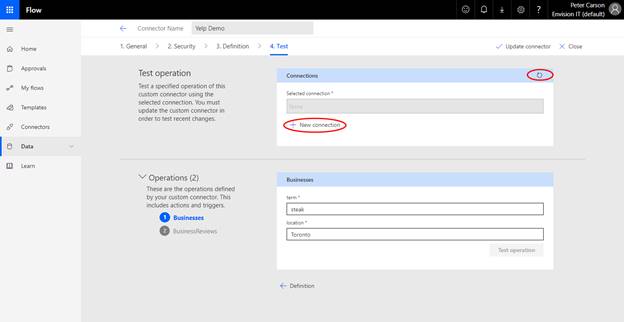
You can now test the Businesses operation, get an id back in the Body, and use that to test out the Business Reviews.
Creating a Flow that uses the Yelp Custom Connector
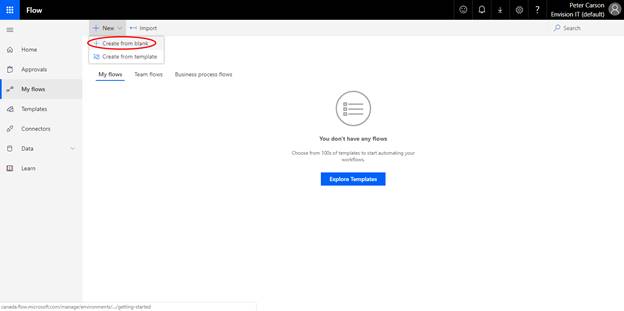
This is one of the shorter sections of the demo. We’re not going to do much with the Flow, just demonstrate how to include the custom connector in a Flow. We’ll start off by creating a new Flow from blank.
Every Flow starts with a trigger. To keep it simple, we’re going to start by naming our Flow as Yelp Demo, and setting a manual trigger.
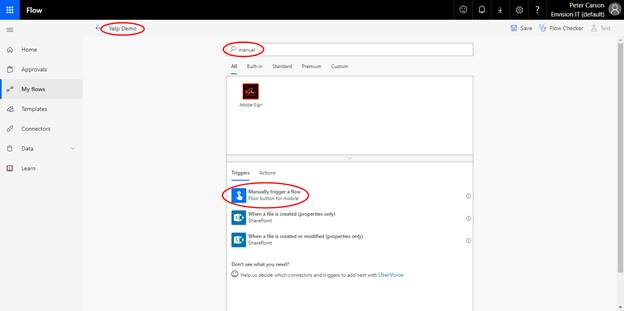
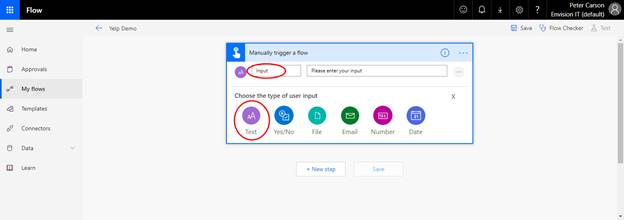
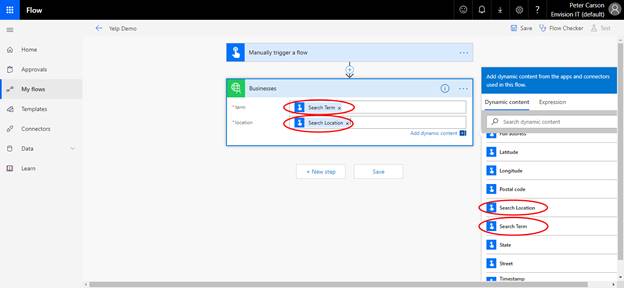
We want two inputs on the trigger, so we can set our search term and location. Add two text inputs, and name them as Search Term and Search Location.

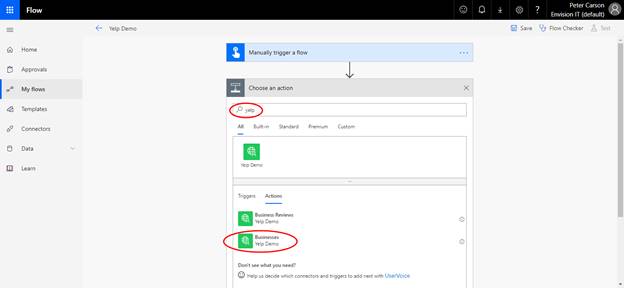
Now let’s add our first step. Search for our Yelp connector and select Businesses.
Now comes the magic part. We connect the term and location parameters on our custom connector to the Search Term and Search Location parameters from the manual trigger inputs.
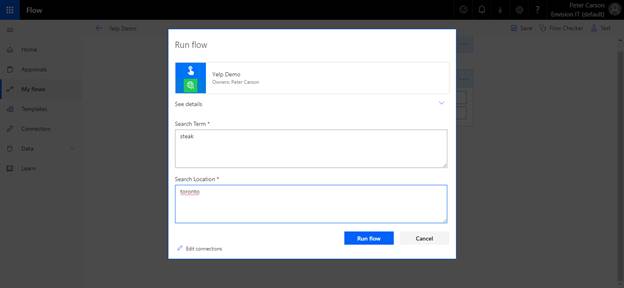
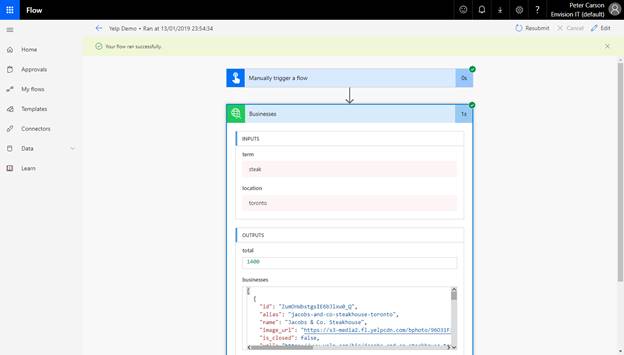
Go ahead and save the Flow and click the Test in the top right.You’ll be prompted for the parameters, and then your Flow will run. View the results, and click in to see the inputs and outputs on the custom connector.
Now to use the same custom connector in a Power App.
Yelp PowerApp
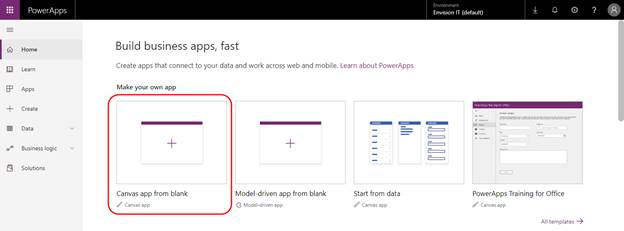
Start off in PowerApps by signing in at https://web.powerapps.com. We’re going to Create an app from blank.
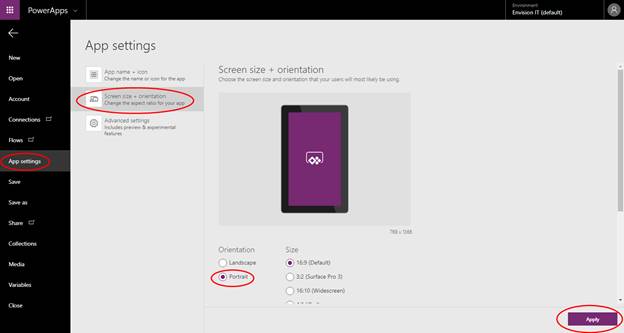
Let’s assume we’re building a mobile application, so let’s set a portrait screen orientation from under the File menu.
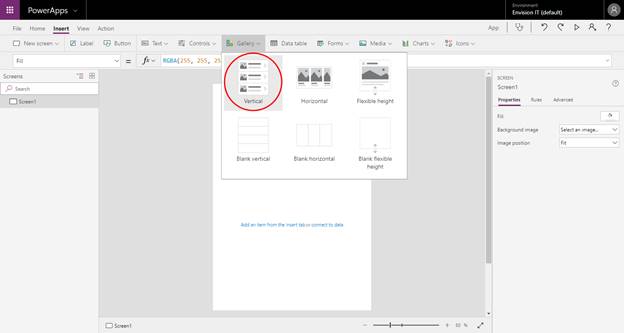
Next let’s insert a vertical gallery that we will list the businesses in.
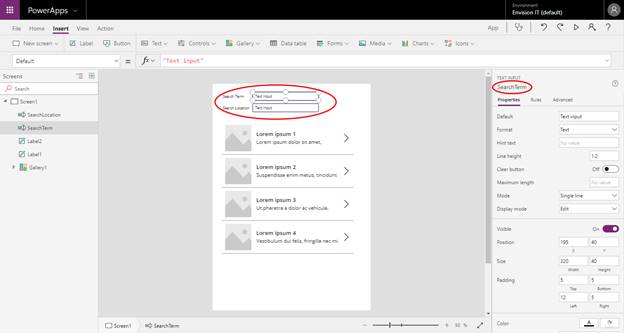
Move the gallery down, and insert two Text Labels, and two Text Inputs. Position and label them accordingly, and make sure you set the control names of the two input boxes to SearchTerm and SearchLocation.This makes it easier to refer to them in formulas later.
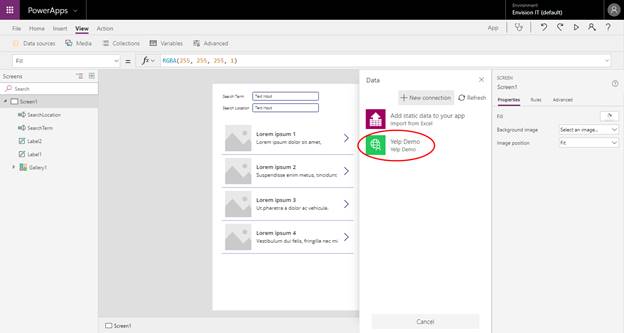
Go to View – Data sources, select Add data source, and select our Yelp Demo custom connector.
Now select the Vertical Gallery we inserted, and set its Items formula to be
'YelpV3-Share'.Businesses(SearchTerm.Text,SearchLocation.Text).businesses

You can fill in a valid sample search term and location, and you should see some changes come back in the gallery.
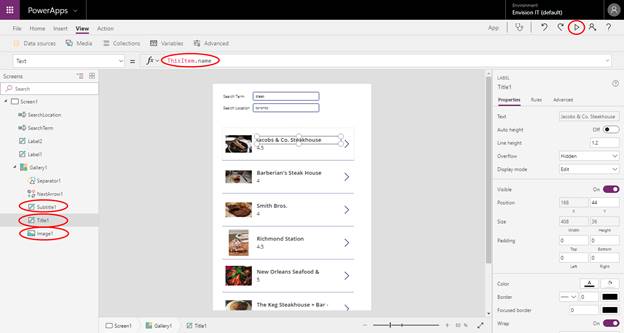
Now we just need to wire the various gallery elements up to the returned values. Set the properties below.
| Control | Property | Value |
| Title1 | Text | ThisItem.name |
| Subtitle1 | Text | ThisItem.price |
| Image1 | Image | ThisItem.image_url |
Once completed, you can run the application with the Play button in the top right corner.
Enjoy!
Latest Articles
Related Pages
{{{hyperlink RelativeURL Title Title null}}}
{{#if EventStartDate}}{{eventDate EventStartDate EventEndDate}}
{{/if}} {{#if PublishedDate1}}{{generalDate PublishedDate1}}
{{/if}} {{#if RollupContent}}{{{RollupContent}}}
{{/if}}{{{hyperlink RelativeURL Title "Read more..." null}}}